|
|
Projects << OmniwheelBotProject << OmniwheelBotNewHardware << OmniwheelBotBarometer | Software Overview | Sitemap | Downloads | Developers | Forums |
|
|
Projects << OmniwheelBotProject << OmniwheelBotNewHardware << OmniwheelBotBarometer | Software Overview | Sitemap | Downloads | Developers | Forums |
|
|
Adding A Barometer and Temperature Sensor
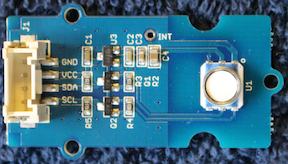
Want to measure temperature and elevation with your bot? Here we'll add a high accuracy barometer sensor with a built temperature sensor. Before starting this project, you should read how to add a flashing light to your bot. This project is very similar to that one, and the Flashing light project has some pictures you may find useful. Hopefully, after learning how add the barometer sensor, you'll see how easy it is to add many other kinds of Arduino sensors. Adding the Sensor HardwareTo add the barometer sensor, buy a Grove Base Shield and a Grove high accuracy Barometer Sensor (there's a photo of the sensor at the top of this page). Using a Grove cable, plug your Grove barometer sensor into an I2C location on your Base Shield. After plugging in your barometer sensor, place the Base Shield somewhere in your bot's stack of shields. We use an Adafruit Motor Shield with stackable headers, so we put our Base Shield between the XBee Shield on the top and the Motor Shield. The Grove cable will flatten out and come out the side. That's all you need to do to add a barometer sensor. Virtual WiringOnce you've got your barometer sensor wired in, Virtual Wiring can read it. You just need to add the barometer sensor to your bot_arduino Device. After you have Virtual Wiring up and running your bot, go to the Virtual Wiring Script page, select the "Arduino" view filter, and run the "BarometerSensorHiAcc" Script. This Script will add terminals for reporting temperature, barometric pressure, and height. For details on the Script and the device terminals, read the High Accuracy Barometer Script documentation. When you run the BarometerSensorHiAcc Script, you will see a dialog box with "arduino_id", and a bunch more parameters. If your system is like ours, you can type in "bot_arduino" (quoted) for your arduino_id parameter. We'll leave the other parameters alone. These parameters add a "trigger" terminal to sample you sensor, and output terminals with pressure, temperature and height. Click on "Submit" and go to the Device Explorer page. You'll see something like this: 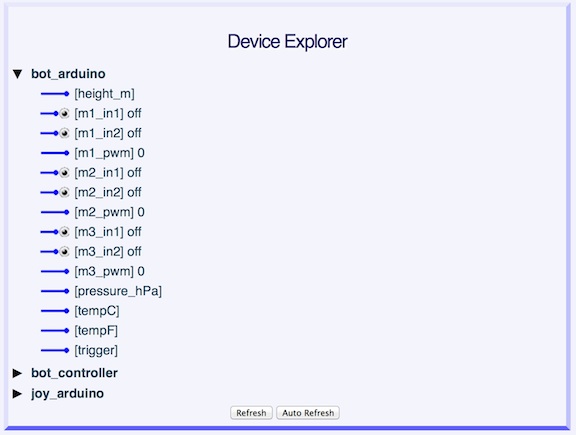
Click on the "trigger" terminal and enter any value ( As we did with when we added a flashing light, we are going to add an oscillator (to stimulate our sensor). Since we don't want to take readings too often (they use up CPU cycles), and our sensor values won't change all that quickly, we'll set our oscillator period to run at 20 seconds. Since the oscillator generates an Similar to the way we did when we added a flashing light, go to the Wires page and wire the "osc" "out" terminal to the "bot_arduino" "trigger" terminal. Were done! Your bot is now free to roam while measuring pressure, temperature, and height every ten seconds. |
Catalina Computing, LLC.Copyright © Catalina Computing, LLC. (2013-2018) 
|
Page last updated: Wed Oct 22 16:06:15 2014 (UTC) |