|
|
Projects << OmniwheelBotProject << OmniwheelBotNewHardware << OmniwheelBotFlashingLight | Software Overview | Sitemap | Downloads | Developers | Forums |
|
|
Projects << OmniwheelBotProject << OmniwheelBotNewHardware << OmniwheelBotFlashingLight | Software Overview | Sitemap | Downloads | Developers | Forums |
|
|
Adding A Flashing Light
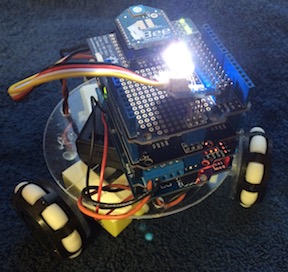
Want to add flashing lights to your bot? Or perhaps lights controlled by your bot program? Lights you can control from the web? Here's how. Light HardwareTo add lights, buy a Grove Base Shield and the Grove LEDs you want. There's lots of different colors and brightnesses. Plug your Grove LED into a free digital location in your Base Shield (these are labeled Dx where "x" is a number in the range 2-8). Be aware that if you have a bot using a Wicked Device Shield, the shield is already using digital pins 2, 5, 6, and 7; the Adafruit shield does not use any digital pins. 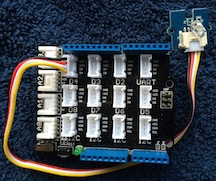
After plugging in your LED, place the Base Shield somewhere in your bot's stack of shields. We use an Adafruit Motor Shield with stackable headers, so we put our Base Shield between the XBee Shield on the top and the Motor Shield. The Grove cable will flatten out and come out the side. That's all you need to do to add an LED. If you want more LEDs, you can add more to your Base Shield. Note: if you don't use Grove devices, you can attach LEDs to the Arduino connectors; depending on your LED, you may need an additional current limiting resistor. Look around the web for more information about attaching LEDs to Arduinos. Virtual WiringOnce you've got your LED wired in, Virtual Wiring can control it. You just need to add a control terminal to your bot_arduino Device. In our example, we've added the LED to the Arduino's digital pin 4. After you have Virtual Wiring up and running your bot, got to the Virtual Wiring Script pages, select the "Arduino" view filter, and run the DigitalOutputs Script. This Script will add a terminal for controlling a digital output. When you run the DigitalOutputs Script, you will see a dialog box with "arduino_id", "names", and "pins" parameters. If your system is like ours, type in the following: These parameters add a "led" terminal to your bot_arduino Device which will control digital output 4. Click on "Submit" and go to the Device Explorer page. If you go the the Explorer page and expand the bot_arduino Device, you'll see something like this: 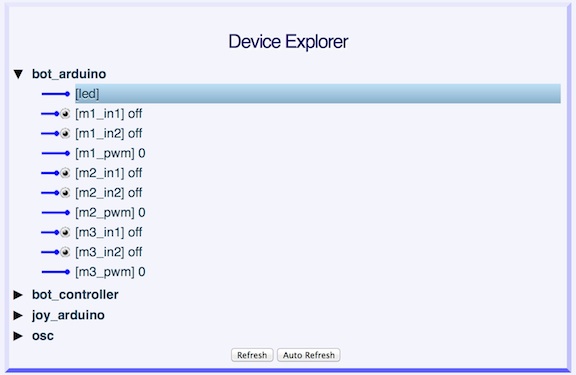
Click on the "led" terminal and enter Now we have a terminal visible from the web which turns the LED on our bot on and off. Let's make it flash. Go to the Scripts page and select the "Active" view filter. Run the Oscillator Script with the following parameters: We've built an oscillator with a 1 second period. Now we are going to "wire" it to the LED so it turns on and off. Go the the Wires page. Draw a wire from the "osc" "out" terminal to the "bot_arduino" "led" terminal (you draw wires by clicking and dragging from terminals on the left side to terminals on the right. You can delete a wire by just clicking on it). If you are using an Adafruit Motor Shield, your wires should look like this: 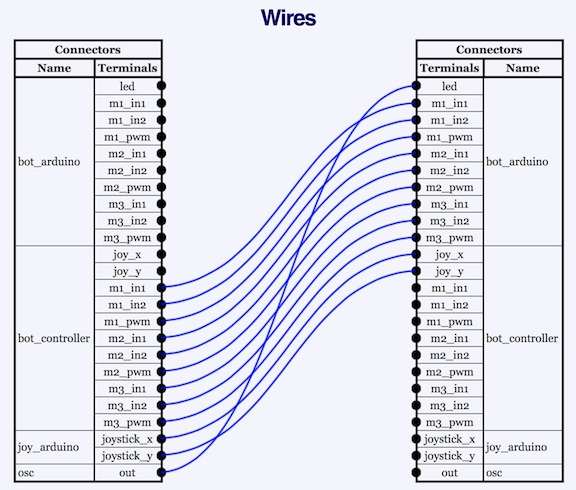
Were done! Your bot has a flashing light. Saving What You've DoneIf you want to save what you've done, go to the Scripts page and click on the "Session Script" button at the bottom. You'll see a page listing all the Scripts you've run along with their parameters. Ours looks like this: 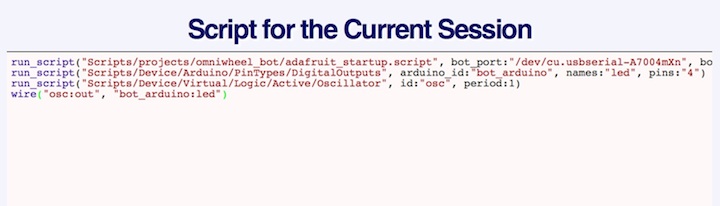
Copy the Script lines from the screen into a file. If you store the file somewhere in your Scripts area (the Scripts/user directory is a good place), you can run it as a Script and it will recreate your bot. If you want to run your Script, remember to restart Virtual Wiring first. Restarting will clear out any pre-existing Devices, and restarting will load the new Script into Virtual Wiring's Script cache. |
Catalina Computing, LLC.Copyright © Catalina Computing, LLC. (2013-2018) 
|
Page last updated: Tue Nov 11 02:38:59 2014 (UTC) |