|
|
Projects << OmniwheelBotProject << OmniwheelBotNewHardware << OmniwheelBot2ndJoystick | Software Overview | Sitemap | Downloads | Developers | Forums |
|
|
Projects << OmniwheelBotProject << OmniwheelBotNewHardware << OmniwheelBot2ndJoystick | Software Overview | Sitemap | Downloads | Developers | Forums |
|
|
Adding A 2nd Joystick for Controlling Your BotSo you've got an omniwheeled bot, and you've been driving it a little bit. Perhaps you've noticed that your bot, though crab-like, rotates a little bit as well - particularly at slower speeds. Our controller math is good, but the bot's analog motors aren't all that precise; they need correction every once in a while. We are going to add a second joystick to our joystick Arduino, so we can rotate our bot clockwise or counter clockwise. If you've got a directional sensor (a camera?) or a directional light mounted on your bot, you can use the joystick to point your bot in any direction. The HardwareBuy a second Grove Thumb Joystick and Grove cable. Your first joystick's cable is plugged into your joystick Arduino's Base Shield A0 connector; plug your 2nd Thumb Joystick into the Base Shield's A2 connector. That's it for hardware setup. 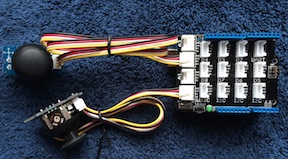
Why plug your joystick into the Base Shield's A2 connector and not the A1 connector? Joysticks actually have 2 analog outputs (one for measuring "x" displacement, and one for measuring "y"). The Base Shield A0 connector uses Arduino pins A0 and A1. The A1 connector uses Arduino pins A1 and A2, and there's the problem. We can't have the 2 joysticks using the same Arduino pins (A1 in this example). So we pick the A2 connector, because it uses Arduino pins A2 and A3. Modifying the Bot's Virtual Device ProgramWe've made a few changes to our bot program. First, we've added 2 new input terminals: "joy2_x" and "joy2_y". These terminals connect to our second joystick. We've made changes to the running code as well. We use the joy2_x values as rotation values. First we normalize the joy2_x values, as we do the values of the first joystick; then we use the normalized values to define our rotation. When the 2nd joystick moves left, we rotate counter clockwise; when 2nd joystick moves right, we rotate clockwise. We use the magnitude of 2nd joysticks's horizontal displacement to define how fast we rotate. We don't use the joy2_y values at all. This means when we move our 2nd joystick up and down, nothing happens. Perhaps you can think of a use for the up/down values from the joystick. You could use them to rotate an on board servo... The modified bot program is listed here. Copy the modified code and paste it over the code in your "virtualizer/programming/vd_omniwheel_bot_controller.rb" file. Save your new vd_omniwheel_bot_controller.rb file. Starting Up the BotSo we've got a new bot program - now we need to get it into our bot project. Restart your Virtual Wiring system to clear out any pre-existing Devices and to load your changes into Virtual Wiring's cache. Go to the Scripts page and select the "projects" View Filter. Make sure your bot is turned on and that you know the USB port names of your bot and joystick Arduinos. Run your startup script. Your bot is up and running...almost... WiringYou bot may be running, but our second joystick isn't wired in yet. We are going to add a new joystick, and we are going to wire the joystick to your new Virtual Device. We'll start by creating joystick terminals on our joystick Arduino. Go to the Scripts page and select the "Arduino" View Filter. Run the ThumbJoystick Script with the parameters shown below. You'll find many of them are pre-initialized for you. Go to the Wires page. We are going to add 2 wires that connect our 2nd joystick to our new Virtual Device terminals. Draw a wire from "joy_arduino" "joystick2_x" to "bot_controller" "joy2_x". Similarly, draw a wire from "joy_arduino" "joystick2_y" to "bot_controller" "joy2_y". Your wires should look like this: 
Now your bot is ready to go. Give it a spin! Saving ThingsYou may want to save what you've done in a new Script. Go to the Scripts page and click on the Session Script button at the bottom. You see a screen with all the commands you've run to create your bot. Ours looks like this: 
Copy the lines from your screen and save them in a new file in your Scripts/user directory. You can run this Script anytime you wish to recreate your bot. |
Catalina Computing, LLC.Copyright © Catalina Computing, LLC. (2013-2018) 
|
Page last updated: Thu Oct 23 18:53:55 2014 (UTC) |