Recipe for a Joystick Controlled Wireless Bot
This Recipe creates a wireless bot which moves under joystick control. The control software is written entirely in Ruby, which makes it easy to understand and modify. It uses 2 XBees to make the bot wireless. It has an optional flashing LED and temperature
sensor.
Ingredients
For this recipe you will need:
- 2 Arduino Unos (running Firmata)
- 1 Grove Thumb Joystick or equivalent
- 1 Grove Shield
- a Grove Shield Bot (version 0.9b, 1.0, 1.1, or equivalent)
- an XBee Wireless Kit**
- an LED (optional)
- a Grove Temperature Sensor (optional)
** wireless kits contain 2 XBees, an XBee Arduino shield, and an XBee to USB adapter board (sometimes called an Explorer).
Make sure the XBees in the kit are both configured to run as a serial link, and that their baud rates are both set to 57600. This baud rate is the baud rate of the Firmata application on the Arduino. The XBee that talks to the Arduino needs to be at the same baud rate as the Firmata application. The XBee attached to the host needs to be running at that same rate, because that makes the XBee wireless link transparent to the host.
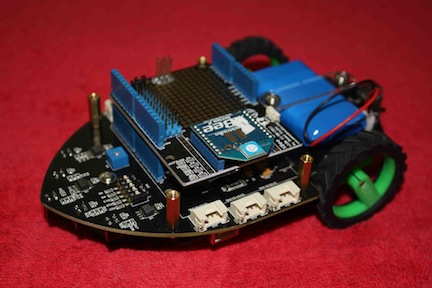
Assemble the Shield Bot according to its instructions and charge the battery. Disable the Bot's 5 builtin IR sensors using the 5 slide switches on the Bot. Make sure the Bot is off, and plug one of the Arduino Unos into the bottom of the Shield Bot. Plug the XBee shield from the Wireless Kit into the top of the Shield Bot, and plug one of the XBees from the Kit into the top of the XBee shield.
If you have the optional LED and Grove Temperature Sensor, connect them to the Bot and note which Arduino pins they are connected to. We connected our LED to Arduino pin 2 and our Temperature Sensor to analog input "A5". When you are done, your Bot should look like this (optional LED and Temperature Sensor not shown):
Wireless Bot (top)
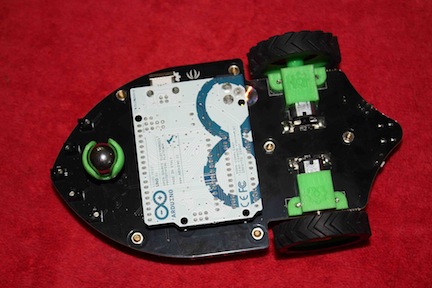
 Wireless Bot (bottom)
We will use a Virtual Device to interface to the Thumb Joystick and to control the Shield Bot. The Virtual Device has 2 inputs for receiving the Joystick outputs, and 6 outputs for controlling the motors of the Shield Bot. The following Virtual Device (Ruby) code needs to be in a file called "vd_shield_bot_controller.rb" and placed in the same directory as the Virtualizer code (so the Virtualizer can find it).
Most likely, the "vd_shield_bot_controller.rb" code is already included in your software release. If so, you don't need to do anything to install it, and the following is for reference only.
"vd_shield_bot_controller.rb" Virtual Device code:
###############################################################################
# Description: Virtual Device Module that controls a Grove Shield Bot using
# a joystick.
###############################################################################
require "thread"

module VdShieldBotController


  private

  #############################################################################
  # Create and return the thread that will control the Shield Bot.
  # This thread polls the event queue and uses the events it finds to control
  # the Bot.
  #############################################################################
  def bot_thread
    return Thread.new do
      begin
        @jx, @jy = nil,nil # init joystick values

        # main loop - process joystick events and control the Bot
        loop do
          event = @event_queue.deq
          if val = event["joy_x"]
            @jx = val
          elsif val = event["joy_y"]
            @jy = val
          else
            p "unexpected event: #{event.inspect}"
          end
          # if have both x & y from joystick, can run things
          if @jx && @jy
            x, y = normalize(@jx, @jy)
            # set the motor speeds
            # y values -> forward/reverse the Bot
            # x values -> turn the Bot right and left
            left_motor(y + x)
            right_motor(y - x)
          end
        end
      rescue Exception
        p $! # say why we crashed in the log
      end
    end
  end

  #############################################################################
  # Takes raw joystick values and normalizes them to work with the Bot.
  # The Bot wants to see x & y values in the range -100 to +100.
  # Uses the first samples to calibrate the joystick.
  #############################################################################
  def normalize(x, y)
    if !@calibrated
      @calibrated = true
      @x_center, @y_center = x, y
    end
    # subtract out the calibration
    x, y = (x - @x_center), (y - @y_center)
    # ignore small deviations when idling (noise)
    (x.abs == 1) && (x = 0)
    (y.abs == 1) && (y = 0)
    # scale value so full range and return the result
    [4 * x, 4 * y]
  end

  #############################################################################
  # Stop the Bot motors.
  #############################################################################
  def bot_stop()
    left_motor()
    right_motor()
  end

  #############################################################################
  # Sets the motor speed of the left motor (goes from -100 to 100).
  #############################################################################
  def left_motor(speed=0)
    pos, neg, pwm = speed2p_n_pwm(speed)
    # send an event to our left motor control terminals
    generate_event("left_motor_pos" => pos,
                   "left_motor_neg" => neg,
                   "left_motor_en" => pwm)
  end

  #############################################################################
  # Sets the motor speed of the right motor (goes from -100 to 100).
  #############################################################################
  def right_motor(speed=0)
    pos, neg, pwm = speed2p_n_pwm(speed)
    # send an event to our right motor control terminals
    generate_event("right_motor_pos" => pos,
                   "right_motor_neg" => neg,
                   "right_motor_en" => pwm)
  end

  #############################################################################
  # Convert a -100 to 100 speed value to a direction and PWM value for a
  # Bot motor.
  # Returns on/off values for the positive and negative terminals of a motor
  # for specifying motor direction, and a 0-100 PWM value for specifying
  # motor speed.
  #############################################################################
  def speed2p_n_pwm(speed = 0)
    if speed == 0
      ret = ["off", "off"] # motor is off
    elsif speed > 0
      ret = ["on", "off"] # forward
    else # less than 0
      ret = ["off", "on"] # reverse
    end
    ret << [100, speed.abs].min # speed
  end

  #############################################################################
  # Virtual device method for processing terminal events.
  # Inputs are a hash where keys are terminal names and values are terminal
  # values.
  # Keep this method short and fast, so we don't hold up the callback thread.
  #
  # Return value must be an event hash.  Return an empty hash if no event,
  # and a terminal/value hash (like the inputs hash) for creating events.
  #############################################################################
  def respond_to_inputs(inputs, outputs = {})

    # put all events of interest into our event queue
    # bot thread will read them out when it can
    inputs.each do |key, val|
      if ["joy_x", "joy_y"].include?(key)
        @event_queue.enq({key=>val})
      else
        if terminal_dids.include?(key)
          # ok, we generated something we don't care about
        else
          p "Unexpected input: #{key}" # log this
        end
      end
    end

    outputs # return nothing - no events generated from here
  end

  #############################################################################
  # Define the terminals that this device uses.
  #############################################################################
  def terminal_dids
    %W(joy_x joy_y left_motor_pos left_motor_neg left_motor_en
        right_motor_pos right_motor_neg right_motor_en)
  end


  #############################################################################
  # Initialization routine - called first, when this file is extended into dev.
  # Set up device defaults (can be overridden by later).
  #############################################################################
  def self.extended(object)
    object.instance_eval do
      @event_queue = Queue.new()
      bot_stop()
      # start up bot thread
      @bot_thread = bot_thread()
    end
  end

end # module
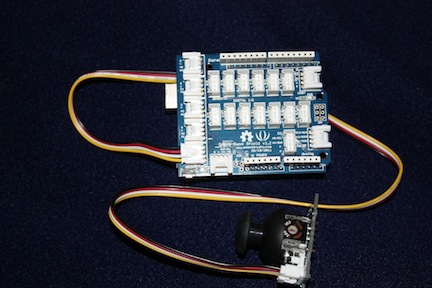
Next, plug the Grove shield onto the 2nd Arduino. Connect the Thumb Joystick to the Grove shield using the analog connector with pins "A0" and "A1" (on our shield, it's on the lower left corner). Plug this 2nd Arduino into a USB port on the host computer. Note the name of the Arduino USB port on the host (on *nix machines, look for a new file in the /dev directory).
Wireless Bot Joystick Connected to Arduino
Turn on the Shield Bot. Plug the 2nd XBee from the Wireless Kit into the USB adapter board from the Kit, and plug this USB board into a second USB port on the host. Note the name of this USB port as well.
Run the Shield Bot Script listed below. You can find the Script in the Scripts "examples" area. The Script is called "bot_with_joystick.script". Just click on its "Run" action to start it running.
The Script adds the 2 Arduinos and the Virtual Device for running the Bot into the system and wires them all together. Use the Thumb Joystick and Bot USB ports you noted for the "joystick_port" and "bot_port" parameters.
The "bot_with_joystick.script" Script (reference only):
# Makes a remote controlled bot using a Seeedstudio Shield Bot.

# An Arduino is plugged into the Shield Bot.  Another Arduino
# has a Seeedstudio Grove Thumb Joystick plugged into it.
# A bot_controller Virtual Device is created; it uses joystick
# input to generate Shield Bot controlling outputs.
# The Thumb Joystick outputs are wired to the bot_controller, and
# the bot_controller outputs are wired to the Shield Bot.

# The bot can be made wireless, if you use an XBee based serial link between
# your host and the bot.  You will need to have an XBee wireless kit and plug
# its XBee shield to the top of your bot, and plug the USB board into your host.
# Make sure both XBees are set to run at the Firmata serial rate (57600 baud).

# Supports an optional flashing LED and Grove Temperature Sensor on the bot.
# If these are not wired up, the Script will still run.


# get USB ports of the Arduinos
script_parameters("bot_port")
script_parameters("joystick_port")


# Define the analog sampling times for the Joystick and Bot Arduinos.
# The Bot Arduino is only sampling temp, so it can be slow.
# The Joystick Arduino should be at about 0.1s (100ms) for good performance,
# but if the host is overloaded by the short sample time, the system may work
# better with a longer sampling time (say 200ms).
optional_script_parameters(bot_sampling_ms:1000)
optional_script_parameters(joystick_sampling_ms:100)


# define Arduino pin on the bot where our flashing LED will be
optional_script_parameters(bot_LED:2)
# define Arduino pin on the bot where temp sensor will be
optional_script_parameters(bot_temp:"A5")


# create bot Arduino
# sample slowly, only doing temperature readings (can save CPU cycles)
run_script("Scripts/Device/Arduino/Arduino", analog_sample_period_ms:bot_sampling_ms, id:"bot", port_location:bot_port)

# Create Shield Bot pins
# If you have a newer bot, use the V1.1 Script
run_script("Scripts/Device/Arduino/Devices/Seeed/ShieldBot_V0.9b", arduino_id:"bot", left_mot_pos:"left_mot_pos", left_mot_neg:"left_mot_neg", left_mot_en:"left_mot_en", right_mot_pos:"right_mot_pos", right_mot_neg:"right_mot_neg", right_mot_en:"right_mot_en")
# run_script("Scripts/Device/Arduino/Devices/Seeed/ShieldBot_V1.1", arduino_id:"bot", left_mot_pos:"left_mot_pos", left_mot_neg:"left_mot_neg", left_mot_en:"left_mot_en", right_mot_pos:"right_mot_pos", right_mot_neg:"right_mot_neg", right_mot_en:"right_mot_en")

# create the LED output on the bot
run_script("Scripts/Device/Arduino/PinTypes/DigitalOutputs", arduino_id:"bot", names:"LED", pins:bot_LED)

# create the temp input on the bot
run_script("Scripts/Device/Arduino/Devices/Seeed/TemperatureSensor_F", arduino_id:"bot", name:"temp", pin:bot_temp)


# create joystick Arduino
run_script("Scripts/Device/Arduino/Arduino", analog_sample_period_ms:joystick_sampling_ms, id:"joystick", port_location:joystick_port)

# Add the joystick interface
run_script("Scripts/Device/Arduino/Devices/Seeed/ThumbJoystick", arduino_id:"joystick", x_name:"joystick_x", x_pin:"A0", y_name:"joystick_y", y_pin:"A1")


# Create a virtual device to control the bot
add_device(type_file:"virtual_devices", module_file:"vd_shield_bot_controller", id:"bot_controller")


# Create an oscillator we can use to flash the LED on the bot
run_script("Scripts/Device/Virtual/Logic/Active/Oscillator", id:"light_flasher", period:1)


# wire things together
wire("joystick:joystick_x", "bot_controller:joy_x")
wire("joystick:joystick_y", "bot_controller:joy_y")
wire("bot_controller:left_motor_pos", "bot:left_mot_pos")
wire("bot_controller:left_motor_neg", "bot:left_mot_neg")
wire("bot_controller:left_motor_en", "bot:left_mot_en")
wire("bot_controller:right_motor_pos", "bot:right_mot_pos")
wire("bot_controller:right_motor_neg", "bot:right_mot_neg")
wire("bot_controller:right_motor_en", "bot:right_mot_en")
wire("light_flasher:out", "bot:LED")
If you have an LED on the Bot, it should start blinking. Try changing the blink frequency by opening the Console and typing:
poke "light_flasher", "set_period 2"
You can try other periods (even fractional ones like 0.5). Just don't set the
period to be too small, or you could saturate your serial link and paralyze your Bot.
Grab your Thumb Joystick and start driving.
|
|
